一、安装 NFS 服务器
1
2
3
4
5
6
7
8
9
10
11
12
13
14
15
16
17
18
19
20
21
22
23
24
25
26
27
28
29
30
31
32
| 服务端节点:
yum -y install nfs-utils
mkdir /nfs-{1..6}
cat /etc/exports
/nfs-1 *(rw,no_root_squash,no_all_squash,sync)
/nfs-2 *(rw,no_root_squash,no_all_squash,sync)
/nfs-3 *(rw,no_root_squash,no_all_squash,sync)
/nfs-4 *(rw,no_root_squash,no_all_squash,sync)
/nfs-5 *(rw,no_root_squash,no_all_squash,sync)
/nfs-6 *(rw,no_root_squash,no_all_squash,sync)
systemctl enable nfs-server
systemctl restart nfs-server
客户端节点:
yum -y install nfs-utils
systemctl enable nfs-server
systemctl restart nfs-server
showmount -e nfs-server-IP
Export list for 192.168.1.169:
/nfs-6 *
/nfs-5 *
/nfs-4 *
/nfs-3 *
/nfs-2 *
/nfs-1 *
|
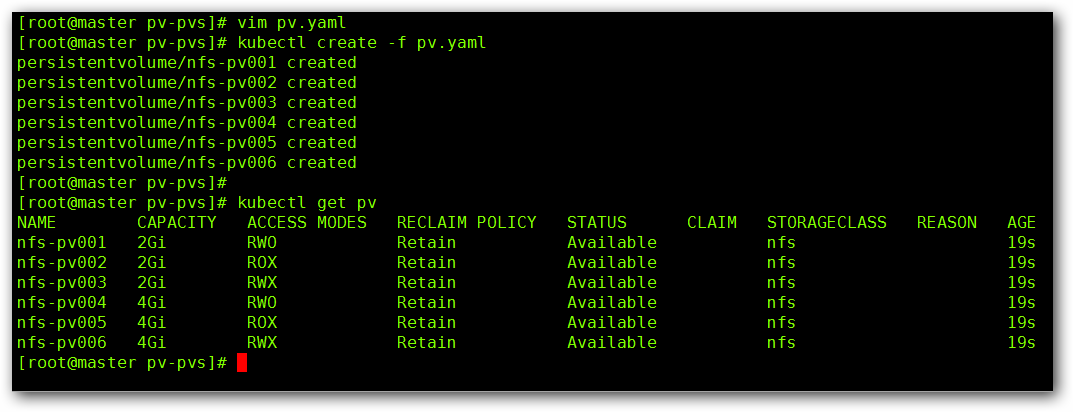
二、部署 PV
1
2
3
4
5
6
7
8
9
10
11
12
13
14
15
16
17
18
19
20
21
22
23
24
25
26
27
28
29
30
31
32
33
34
35
36
37
38
39
40
41
42
43
44
45
46
47
48
49
50
51
52
53
54
55
56
57
58
59
60
61
62
63
64
65
66
67
68
69
70
71
72
73
74
75
76
77
78
79
80
81
82
83
84
85
86
87
88
89
90
91
| vim pv.yaml
apiVersion: v1
kind: PersistentVolume
metadata:
name: nfs-pv001
spec:
capacity:
storage: 2Gi
accessModes:
- ReadWriteOnce
persistentVolumeReclaimPolicy: Retain
storageClassName: nfs
nfs:
path: /nfs-1
server: 192.168.1.169
---
apiVersion: v1
kind: PersistentVolume
metadata:
name: nfs-pv002
spec:
capacity:
storage: 2Gi
accessModes:
- ReadOnlyMany
persistentVolumeReclaimPolicy: Retain
storageClassName: nfs
nfs:
path: /nfs-2
server: 192.168.1.169
---
apiVersion: v1
kind: PersistentVolume
metadata:
name: nfs-pv003
spec:
capacity:
storage: 2Gi
accessModes:
- ReadWriteMany
persistentVolumeReclaimPolicy: Retain
storageClassName: nfs
nfs:
path: /nfs-3
server: 192.168.1.169
---
apiVersion: v1
kind: PersistentVolume
metadata:
name: nfs-pv004
spec:
capacity:
storage: 4Gi
accessModes:
- ReadWriteOnce
persistentVolumeReclaimPolicy: Retain
storageClassName: nfs
nfs:
path: /nfs-4
server: 192.168.1.169
---
apiVersion: v1
kind: PersistentVolume
metadata:
name: nfs-pv005
spec:
capacity:
storage: 4Gi
accessModes:
- ReadOnlyMany
persistentVolumeReclaimPolicy: Retain
storageClassName: nfs
nfs:
path: /nfs-5
server: 192.168.1.169
---
apiVersion: v1
kind: PersistentVolume
metadata:
name: nfs-pv006
spec:
capacity:
storage: 4Gi
accessModes:
- ReadWriteMany
persistentVolumeReclaimPolicy: Retain
storageClassName: nfs
nfs:
path: /nfs-6
server: 192.168.1.169
|

三、创建服务并使用 PVC
1
2
3
4
5
6
7
8
9
10
11
12
13
14
15
16
17
18
19
20
21
22
23
24
25
26
27
28
29
30
31
32
33
34
35
36
37
38
39
40
41
42
43
44
45
46
47
48
49
50
| vim statefuset.yaml
apiVersion: v1
kind: Service
metadata:
name: nginx
labels:
app: nginx
spec:
ports:
- port: 80
name: web
clusterIP: None
selector:
app: nginx
---
apiVersion: apps/v1
kind: StatefulSet
metadata:
name: web
spec:
selector:
matchLabels:
app: nginx
serviceName: "nginx"
replicas: 3
template:
metadata:
labels:
app: nginx
spec:
containers:
- name: nginx
image: docker.io/nginx
imagePullPolicy: IfNotPresent
ports:
- containerPort: 80
name: web
volumeMounts:
- name: www
mountPath: /usr/share/nginx/html
volumeClaimTemplates:
- metadata:
name: www
spec:
accessModes: [ "ReadWriteOnce" ]
storageClassName: "nfs"
resources:
requests:
storage: 1Gi
|
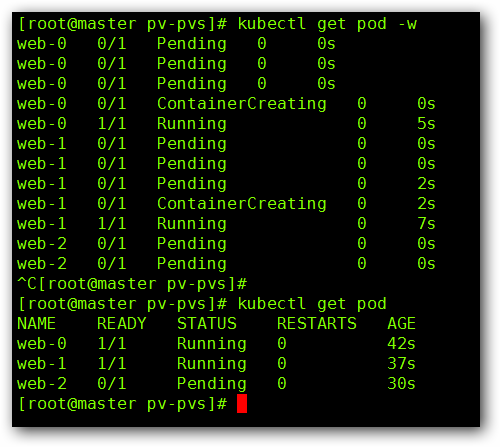
创建后我们来看一下效果,首先看一下 Pod 的创建过程:
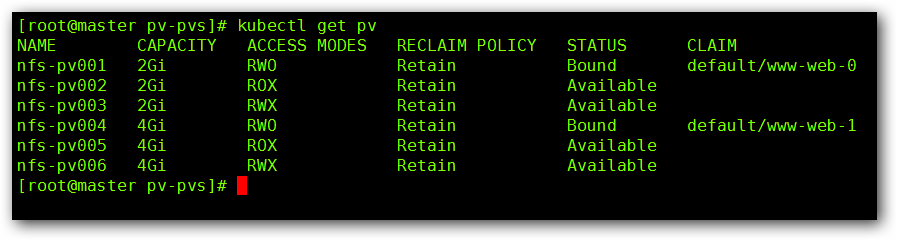
然后我们来看一下 PV 的状态:
通过上述实验截图,我们发现,我们定义了三个副本,但是只有两个副本处于 “running” 的状态,还有一个处于 “pending” 的状态,这是因为,我们定的 PV 的访问模式为 “ReadWriteOnce” , 以单个节点以读/写模式挂载,我们在创建PV 的时候只创建两个模式为 “ReadWriteOnce” 的 PV ,所以第三个 Pod 没有可用的 PV 进行挂载,所以创建不成功。
还有,我们要注意一下 StatefulSet 控制器,在创建的时候它是一个一个按照顺序的进行创建,在删除的时候,也是有序进行的删除。
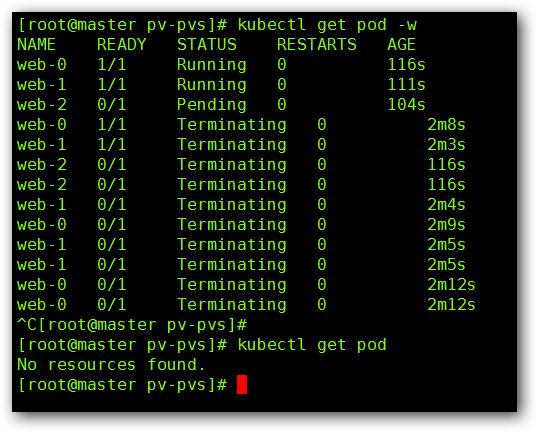
四、PV 资源回收
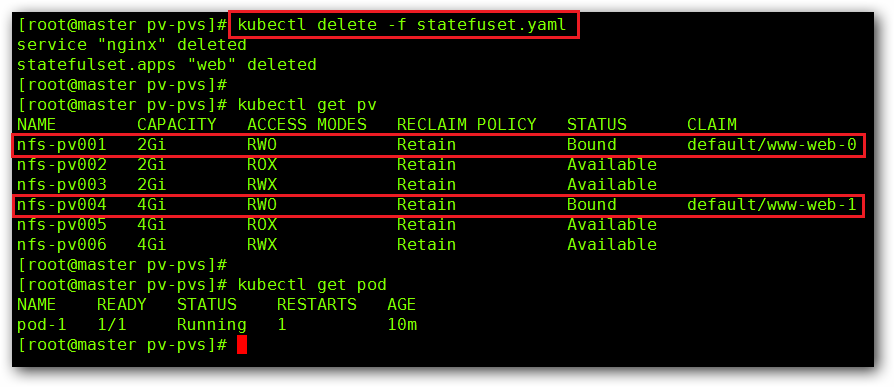
我们将由 StatefulSet 控制器创建的 Pod 进行删除操作,然后我们在查看一下我们的 PV 的状态:
这里,我们可以看到,由 StatefulSet 控制器创建的 Pod 已经全部删除了,但是我们的 PV 资源还没有释放,这是因为我们回收策略的原因所导致的,那么我们来手动回收一下:
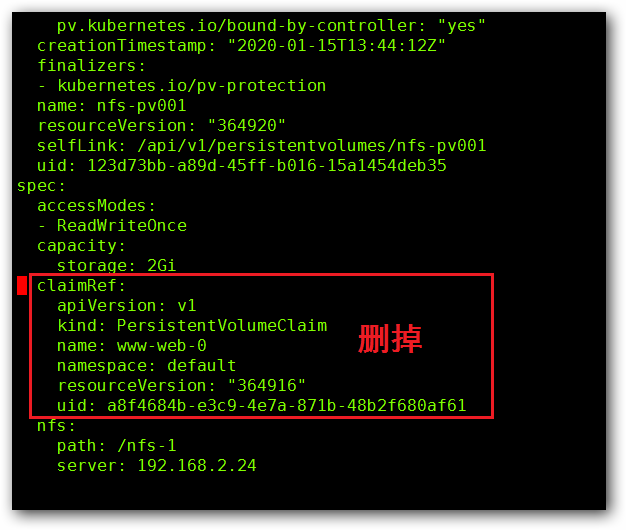
通过命令 kubectl edit pv nfs-pv001 来将 “claimRef” 字段进行删除,然后查看下 PV 状态。
删除 “claimRef” 前:
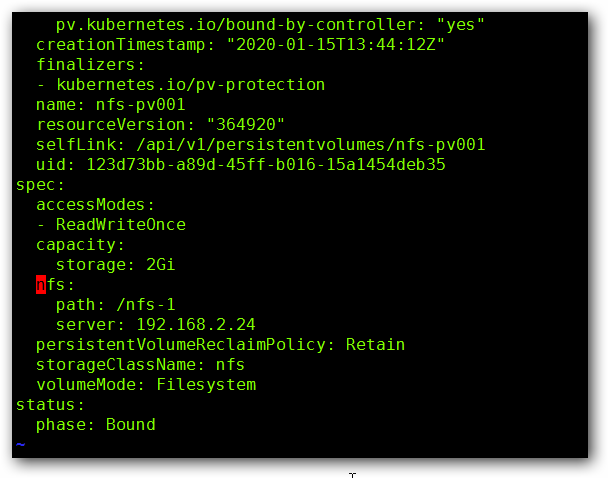
删除 “claimRef” 后:
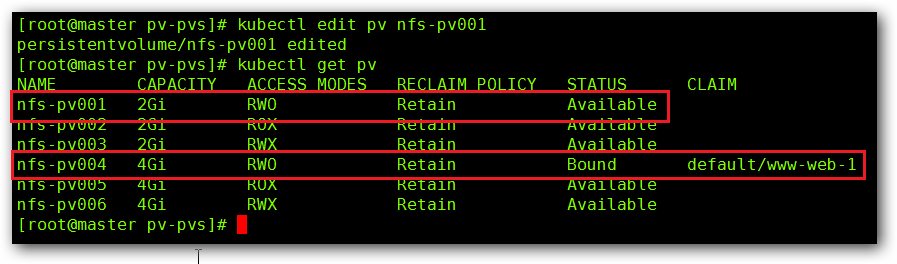
然后查看下 PV 的状态: